This is a translation of the series of articles http://blog.astrumfutura.com published, not an official translation, but a volunteer to make it known in our language.
is almost mandatory when it comes a new programming topic, the author present the simplest example possible. usually, this means using a programming language or framework to print "Hello World" on screen. I'm not going to be different. So much for originality ...
Previously: Part 2 - The MVC Application Architecture
Step 1: Creating a new application
Before jumping to programming with the Zend Framework there are some configuration tasks. Need to install the Zend Framework, get a running virtual domain, and have a basic collection of directories and files created to adhere blank our source code.
You will need to download the Zend Framework 1.5.3 (Recent release) http://framework.zend.com and put it somewhere in your path includes (included). I try to minimize the number of routes includes and not end up having to choose odd routes (such as PEAR directory usually already in the include_path ) or other central location of libraries like PEAR where it could have a dozen libraries gathered.
A common solution found in Blogs and Articles is to put the framework inside the "library" which would be located within the "application" the directory tree. I usually do not recommend this unless your application requires a specific version of Zend Framework - A Zend Framework centralized location for multiple applications to access it, you can make maintenance a little easier.
I decided to use a virtual host, mainly because it is easy to install and helps avoid some annoying issues that are obtained based routes in HTML when using mod_rewrite for urls accessible - especially in developing countries where, if contrariom root localhost document becomes a mass of subdirectories of subdirectories that end up causing problems of a href very easily. Usually I open the virtual-host.conf file from the Apache conf directory and add something like
 NameVirtualHost *: 80


 \u0026lt;VirtualHost *:80>

 DocumentRoot "/ path / to / htdocs" ServerName


 localhost \u0026lt;/ VirtualHost>


 \u0026lt;VirtualHost *:80>

 zfblog

 ServerName DocumentRoot "/ path / to / project / trunk / public"

 \u0026lt;/ VirtualHost>
This should lead to all HTTP requests to http://zfblog/ reach the selected document root (which is the public directory for the project, which contains the index.php, located in our subversion working copy into the "trunk"). We will create this directory structure later. Usually also need to reference to localhost to ensure its recognition by the host paerte properly - otherwise any referral to localhost has already made suddenly be diverted to the root of documents mysteriously zfblog ;-).
For those of you who are Windows XP or Vista, also have to add the new virtual domain to your hosts file (usually C: \\ WINNTsystem32 \\ drivers \\ etc \\ hosts). This is somewhat more difficult in Vista - will probably need to change the file permissions of the files using an Administrator account to grant the local user additional privileges to edit. Be sure to reverse the privileges afterwards! Edit View only
 # Copyright (c) 1993-1999 Microsoft Corp.

 # # This is a sample HOSTS file Used by Microsoft TCP / IP for Windows.
127.0.0.1 localhost 127.0.0.1
zfblog
Part less interesting is the creation of a directory tree to hold our source code. Wil Sinclair along Zend is working on a component that will surely one day Zend_Build eliminate repetition in the creation of these directories and files by default. Until then, let's follow the monotony (or hold a skeleton hand to copy and paste ;-)).
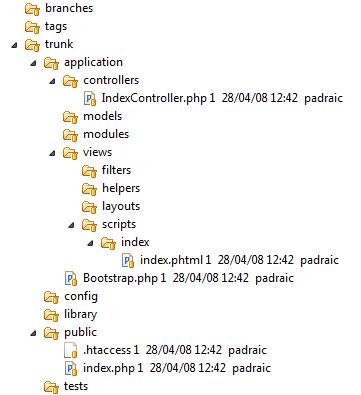
Here is a picture of the Hello World example and as seen in the light of directories from Eclipse:
Copy and create the same structure durectorios in a new directory named as you wish, in this case we will call "zfblog ". If you want to put everything in the "trunk" is optional - Here I have used subversion, that is the reason why there is a directory "trunk". If you have not reached prior to use Subversion, I suggest you learn a little more about this tool is highly recommended for use, and is simple to learn and use.
We will review briefly each of these directories.
The "application" directory is where all components are located where an application implements the Model-View-Controller. Within the "application" find "controllers", "models" and "views" that represent the respective locations for the controller, model and view the source code and templates. Under "Views" is a subdivision between "Filters", "helpers", "layouts" and "scripts." For now, remember that we put all the templates rendered by the view scripts. In the screenshot, we see a directory containing a file index index.phtml, which is the view template for a class IndexController indexAction. others know them then.
The directory "modules" is also for drivers, models and views, but here are categorized into multiple divisions of an application. If you think you can see that an application can be separated into several parts, eg the main application and an administration part. The administration section could be separated within the Admin module is therefore intertwined with the main application.
Bootstrap.php there a file in the "application" which is a class called "Bootstrap." Its purpose is to initialize the Zend Framework, set preferences for the environment (for example, time zone and the error_reporting level), and secondly make adjustments and additions specific to the application before processing an HTTP request. Many tutorials use alternative views and Bootstrap put the code within the code of index.php. I recommend you avoid this method and use a real class to organize the Bootstrap code - this makes it much easier read if nothing else!.
The directory "config" you have the configuration data for the application, for example, details of the connection to the database.
The directory "library" may have a copy of Zend Framework. Usually I avoid this because it is much easier to add the Zend Framework PHP include_path. yet this is very useful if you want to change the version of Zend Framework for a more flexible use. is also very useful if you use it to add a reference svn: external to the subversion repository of the Zend Framework.
The directory "public" has all the arcivos accessible by a web server request. this directory include an index.php file that handles all requests from the application calling the Bootstrap case and any CSS file, HTML, javascript etc ...
A note on the deployment in practice: in general, the deployment you move the "public" directory to your web server to be accessible over the Internet, but retains the non-public directories in the root directory of the site. as index.php ends up making a simple reference to the file Bootstrap.php including, means that many of the application files will not be accessible by Internet users. It also means the end index.php file is located deciding where Bootstrap file - So is the only file that will always need to be edited by hand to display and change the location as necessary.
The directory "test" usually have any unit specific application, specification and acceptance testing. As I said earlier, I'm taking a deliberate approach to test-light to stay on the subject (I have more than a paper test / development in the Zend devZone in case you are interested in applying TDD or BDD). The main evidence that I hope to have are for specific classes of application: any logical model for example.
At the end of this step Deneri have a structured directory place containing some white file as follows (believe it now, and fill them later):
 / application / Bootstrap.php

 / application / controller / IndexController.php

 / application / views / scripts / index / index . phtml

 / public / index.php

 / public / .htaccess
Step 2: Implementing our Bootstrap file.
The Bootstrapping is when we set the initial environment and the Zend Framework inicalizamos for our application. It is not difficult to write a file, but can grow and become more complex as our application to do more in features. To handle this is highly recommended to implement methods in a class with small in size. For the skeleton of our Hello World application, / application / Bootstrap.php contains:
require_once 'Zend / Loader.php';
Bootstrap class
{public static $ FrontController = null;
public static function run ()
{self:: setupEnvironment ();
self:: prepare ();
$ response = self:: $ FrontController-> dispatch ();
self::sendResponse($response);
}
public static function setupEnvironment()
{
error_reporting(E_ALL self::setupView();
}
public static function setupFrontController()
{
Zend_Loader::registerAutoload();
self::$frontController = Zend_Controller_Front::getInstance();
self::$frontController->throwExceptions();
self::$frontController->returnResponse(true);
self::$frontController->setControllerDirectory(
dirname(__FILE__) . '/controllers'
);
}
public static function setupView()
{
$view = new Zend_View;
$view->setEncoding('UTF-8');
$viewRenderer = new Zend_Controller_Action_Helper_ViewRenderer($view);
Zend_Controller_Action_HelperBroker::addHelper($viewRenderer);
}
public static function sendResponse (Zend_Controller_Response_Http $ response) {
$ response-> setHeader ('Content-Type', 'text / html; charset = UTF-8', true);
$ response-> sendResponse ();}
}
Bootstrap class has two main methods here: run () and prepare (). run () executes a complete request to the application, while the prepare () only sets (but not running) the Front Controller. For now's focus on run () and all the steps that our Bootstrap performs when called, the prepare () method is the one I use when I apply TDD or BDD for the development of drivers, and delegating the implementation of the controller to the test framework.
The first is to configure the local environment. So here we have established a zone (As required PHP), enable the PHP display_errors. a fairly rigid set an error level of information. If putting the basics in a class seems counterintuitive, you can simply extract the file header. And usually I test a lot, normally I do not want running during my tests and interfering with the test results.
Second, prepare the Front Controller. Zend _controller is an implementation of Front Controller design pattern, which acts as a single point of entry to an application architecture Model-View-Controller. Each request is for an existing public record through it. In our case, since the bootstrap is included in and is called by public / index.php, "index.php" is our single point of entry.
Thus, the stage of prepare () involves the creation of the Front Controller:
- an instance of Zend_Controller_Front Ontiene
- set it to capture all exceptions (Maybe you want to turn it off when in production).
- set to return a Response object when shipping.
direct you to the default drivers.
The last step of prepare () makes some changes to the view. The reason I did this is to show how to make a common change - adding support for output in UTF-8 encoded. Do not worry too much about the details now - The Action Helper and the Helper Broker ViewRenderer to add or modify the Action Helpers and is well covered by Matthew Weier O'Phinney on Zend Devzone - http://devzone.zend.com/article / 3350-Action-Helpers-in-Zend-Framework.
Now, what about
/ public / index.php
?
/ / Update after deployment for location of non-public files $ root = dirname (dirname (__FILE__));
/ / We're Assuming the Zend Framework is Already on the include_path set_include_path (
)
require_once 'Bootstrap.php';
Bootstrap:: run ();
In Simplicity itself! The Index is our only point of the Front Controller within a Zend Framework application, and everything you need to determine is a valid include_path the implementation and delegate all tasks to run () method of the Bootstrap class.
The final step is how to make all applications for "http://zfblog/" pass through index.php. This is solved by using Apache Rewrite module, which simply takes the URL of an incoming request and rewrites pointing to index.php. If you have never used the Apache Rewrite probably need to enable it in the htttp.cond before work. The rewriting rules can be defined in Apache httpd.conf file or just using a. Htaccess in the "public" that contains the rules:
The
. Htaccess file here, first enable the re-write, and then specify the rules. The rules of this mapped all requests to index.php, unless referring to a file that exists on the server (ie not going to rewrite the URL to CSS, Javascript and image files).
Step 4: Implementing the Controller Index Before proceeding, a few words about the relationship Controller / Vista. Some time ago it was decided to automated interpretation in the default mode of Zend Framework. This means that the driver rarely needs intervention manual to interpret the Vista - instead call an Action Helper ViewRenderer (which should sound familiar because we use it to add the UTF-8 in our Bootstrap) is called. This Helper located a view that matches the name of the controller and current action, automatically interprets it. There are ways to disable the automated interpretation as documented in the manual - which is often useful when you want to bypass the Zend_View.
If the URL of a request sent to the application in Zend Framework does not contain a reference controller or action, the Zend Framework uses the default "index". Since only try to make application to the root URL "hhtp: / / zfblog" IndexController need a containing an Index Action. Let's create one!. Add a file named "IndexController.php" application / controllers containing:
public function indexAction (
)
{$ this -> view ->
title = 'Hello, World! "
; } }
All drivers must extend Zend_Controller_Action, as it contains all internal references to methods and properties common to all drivers. When adjusting the controller is used to add new methods or properties can do this using a subclass of Zend_Controller_Action and then have all the drivers spread application of this subclass rather than the original. Be very careful though to ahcer subclasses of this form - is useful for adding new properties to the class, but additional methods is often best to add them as discrete Action Helpers. Our new
Action method ignores the presentation was done automatically as described above. All you need is to set the view of data we need. You can add almost anything in sight, and that makes a property in a View template. So, feel free to add objects and arrays. If using Smarty or PHPTAL, this could be different. Top said that the Vista in the templates could refer to a Variabel title and give a value of "Hello, World." Once the action method is performed, the ViewRenderer throws and tries to interpret a template located at '/ path / to / the / application / views / scripts / index / index.phtml'.
Step 5: Implementing the view to IndexController: indexAction ()
By default, the Zend Framework, or more specifically the ViewRenderer Action Helper, try to interpret a template for all Action Controller using a simple convention, For example, the template for IndexController: indexAction () should be located in "/ index / index.phptml" in the subdirectory "scripts" of "views".
Zend_View component is responsible for interpreting all the palntillas view, often with a little help (Example: ViewRenderer or Zend_Layout) from the controller. Zend_View is a HTML template (or some other type of output) interspersed with PHP and do not use a separate language labels as the Smarty template engine .. Here's something to put in your file index.phtml for our first application in Zend Framework.
\u0026lt;! DOCTYPE html PUBLIC "- / / W3C / / DTD XHTML 1.0 Strict / / EN" "http://www.w3.org/TR/xhtml1/DTD/xhtml1-strict.dtd" > \u0026lt;html xmlns="http://www.w3.org/1999/xhtml"
xml:lang="en" lang="en">
\u0026lt;head>
\u0026lt;meta http-equiv = "Content-Type" content = "text / html; charset =" utf-8 "/>
 \u0026lt;meta name="language" content="en" />

 \u0026lt;title> \u0026lt;? php echo $ this-> escape ($ this-> title)?> \u0026lt;/ title>

 \u0026lt;/ head>

 \u0026lt;body>

 \u0026lt;p> Hello, World! \u0026lt;/ p>

 \u0026lt;/ body>

 \u0026lt;/ html>


 As you can see, is almost pure HTML with PHP only for the inclusion of titles of texts (from our previous look indexAction method ()). To ensure safety against Cross Site Scripting (XSS) must escape all exits from within the application, and Zend_View uses the PHP function htmlspecialchars () from its method Zend_View:: escape (). another that referred to is that since we set up our view to use UTF-8 encoding, this encoding is also passed in htmlspecialchars ().

 Using escape () everywhere, it sounds bad - well, yes, and it is not. It is a headache because it is something that obviously could benefit from automation - Porl or both not to apply the escape is the exception by default. On the other hand, should be at all times so if you see a variable by echo and not surrounded by the method of escape () should proceed with caution.
Step 6: Work?
Go and open the browser, the URL should now http://zfblog/ database return a HTML document containing "Hello. World!"
Conclusion We obtained a simple example, running and running qie giving us some knowledge. But do not let your guard down yet. Like any battle plan, it will not survive the first contact with the enemy (The Marvellous Blog Maugrim too bad ;-)). As we move forward, is more than likely against some eror in our approach and our Bootstrap need to expand to be more maintainable and have not even studied yet Zend_Db!.
's a start, if you're lucky, can be many reusable home employment as a basic skeleton similia to skip all this work to other settings Texts of the Draft in Zend Framework. Note: source code for this entry is available to browse or do a checkout with subversion, from http://svn.astrumfutura.org/zfblog/tags/Part3 . The application for the GNOME cçodigo complete (as exists currently) is in
http://svn.astrumfutura.org/zfblog
.
0 comments:
Post a Comment